Connect your Door Displays to Microsoft 365 (formerly known as 0365)/Exchange Using Delegate Access
The direct method to connect to a resource to Microsoft 365 (formerly known as 0365) or Exchange is described here. It’s very straightforward and should work for 90% of business environments. It needs a visit in the 0365/Exchange directory where resources are listed and delivers the credentials needed by the door display solution. Reset the password and you’re done. The average skilled Administrator should be able to do this within 5-10 minutes. If the user is not allowed to give consent, and admin approval is required, then how to send an approval request is described here.
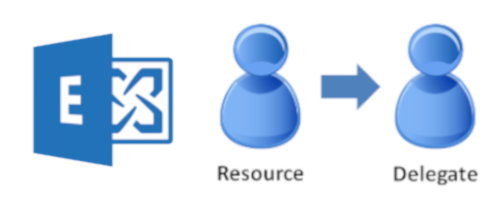
In some business environments the way of directly connecting to resource calendars is not preferred. This could be due to enterprise IT policy or other restrictions. For example, hosted Microsoft 365 (formerly known as 0365) products only allow a subset of functionality for configuring meeting rooms. If you cannot access the “native” user interface of Microsoft 365 (formerly known as 0365), you won’t be able to create a password for a meeting room. Let’s look a the alternative method of delegate access. To put in simple words, we connect either to a service account or to a shared mailbox that has been granted “access rights” for multiple meeting rooms. The creation of this account and the assignment of rights takes place in the Microsoft 365 (formerly known as 0365)/Exchange Admin Center (EAC).
Method 1: Service Account
Create a Service Account
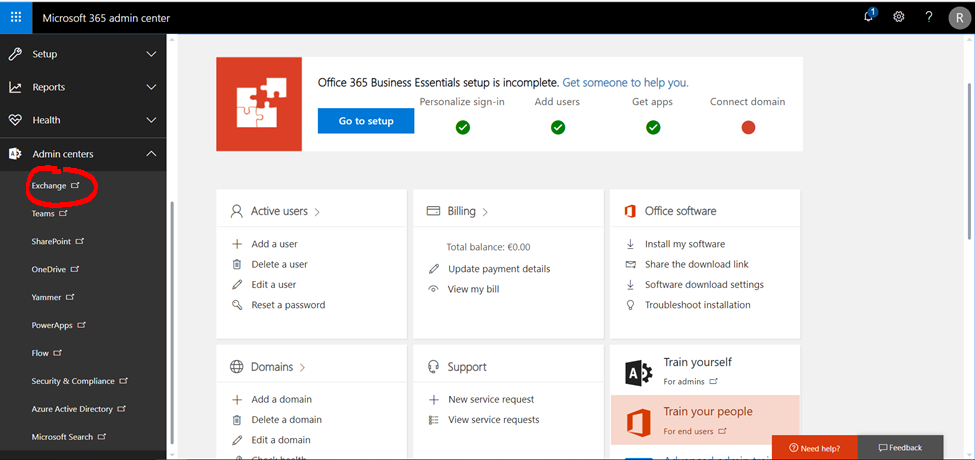
- Open Exchange Admin Center (EAC) as an administrator.
- Go to Users > Active users and click Add a user.
![]()
- In the new user dialog, enter details of your new user.
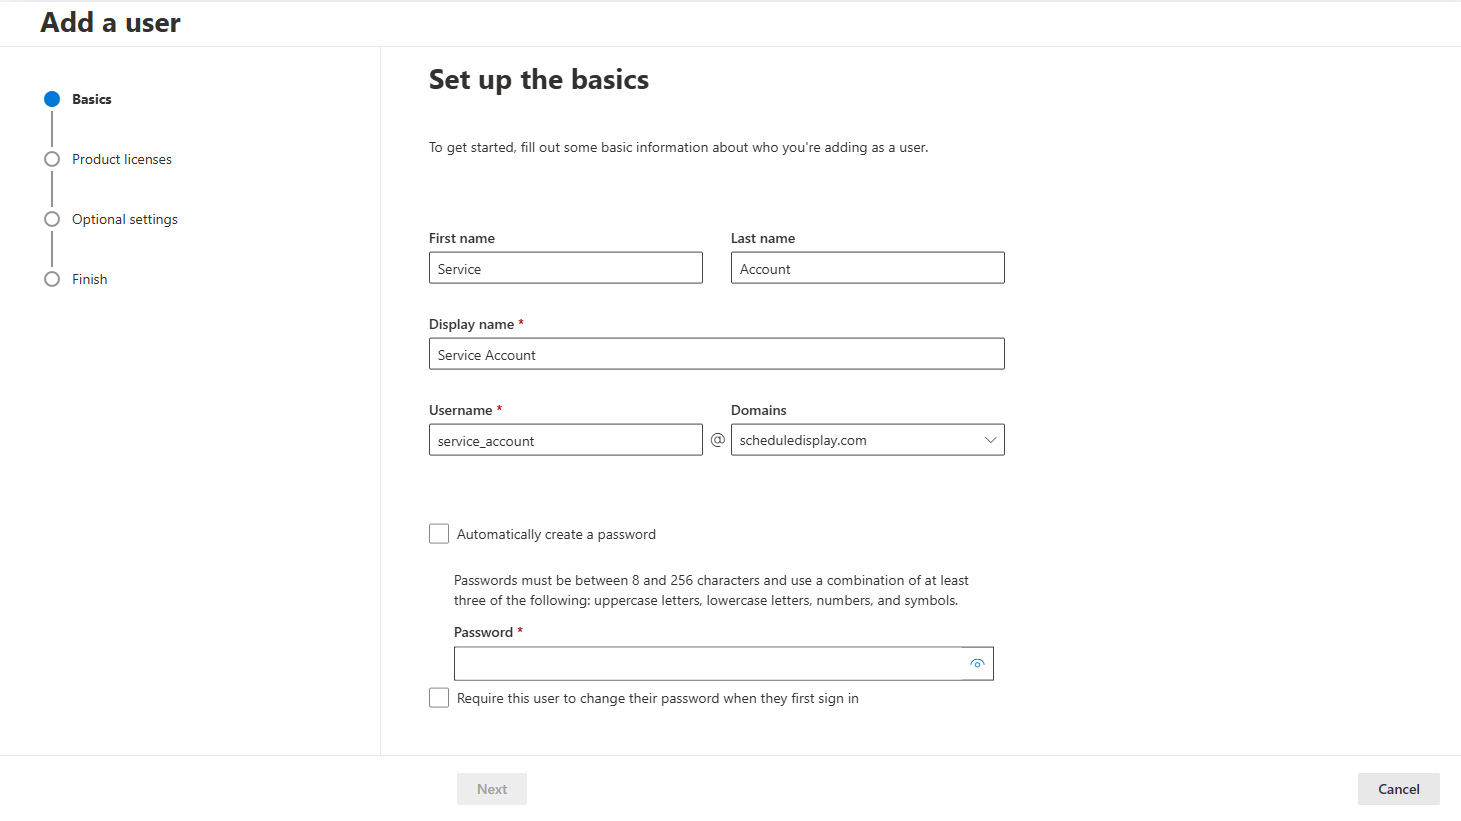
-
- This step might require the purchase of a license. Activate the users license and then click Add.
Assign delegate rights to access the events of the resource calendar
The next step is required to grant the permission to edit the calendar events
- In the EAC, select recipients and resources.
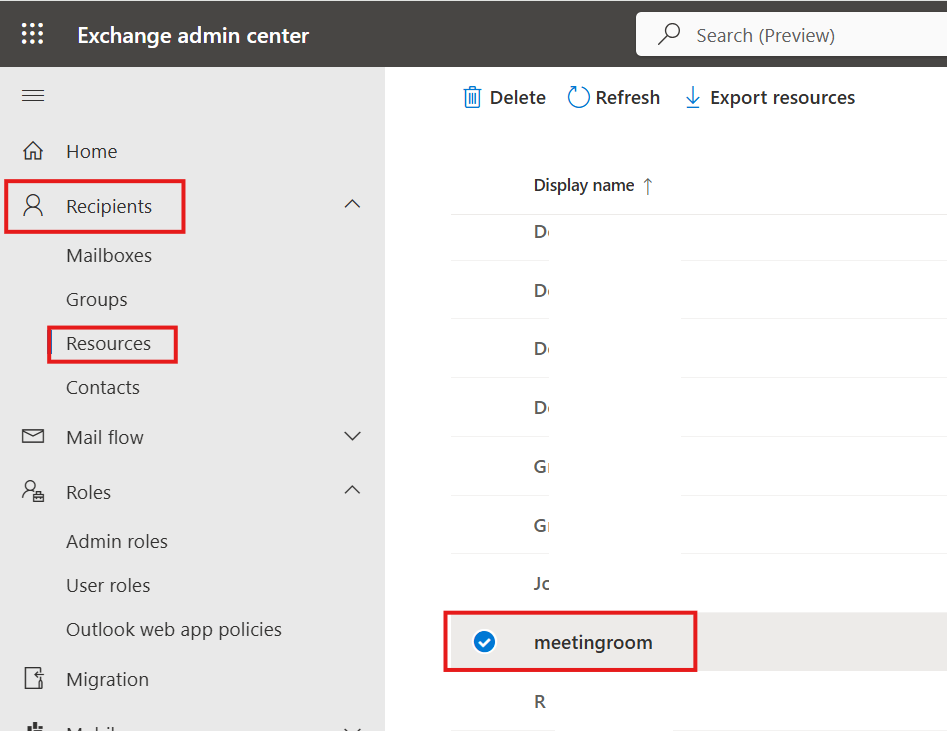
- If you haven’t created a resource yet then click add and read here to create a resource. Select an existing resource and click edit if your resources are already set up.
- In the Edit Room Mailbox dialog, select Delegation, scroll down to Read and manage (Full Access) and click Add/Edit.
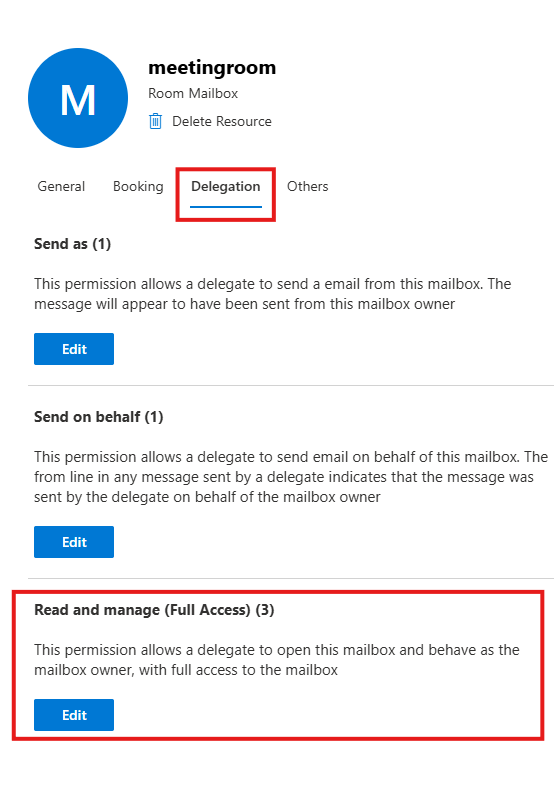
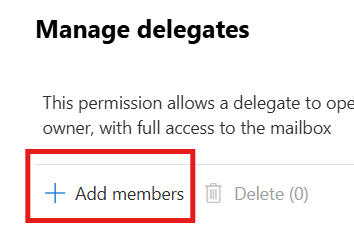
- Click on Add members and Select the service account you created.
- Click Save.
Resolve “The caller has not assigned any of the RBAC roles requested in the management role header”
The second step is to full fill another criteria of the RBAC (role based access control) concept. The service_account user needs to be assigned a specific admin role.
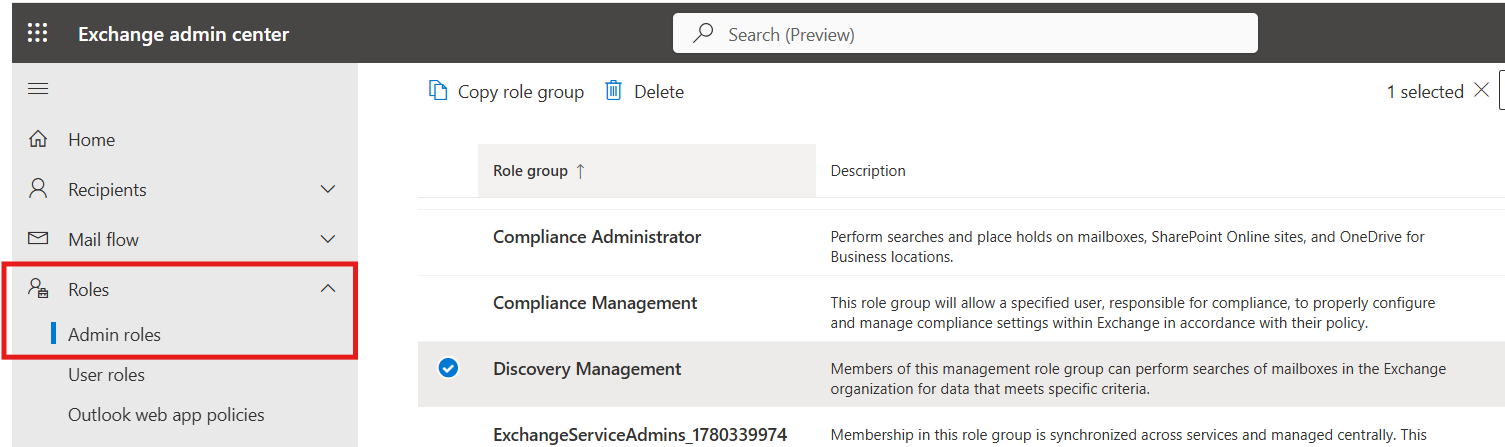
- Open Exchange Admin Center (EAC) as an administrator to fix the RBAC warning issue.
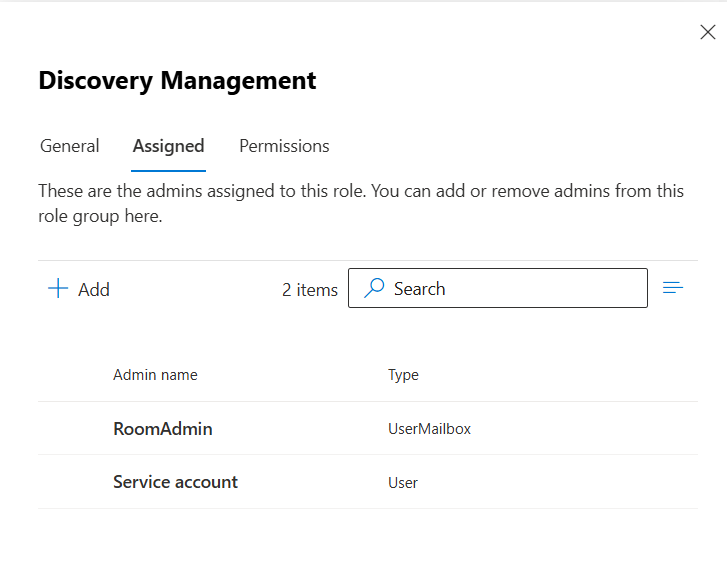
- In the EAC, go to Roles > Admin roles, select the Discovery Management role group.
- On the Discovery Management page, in the Assigned section, click Add.
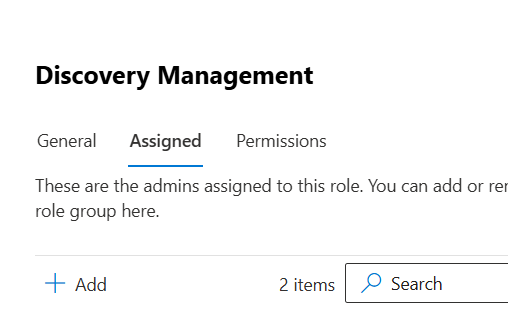
- Select a user or group and click Add. Finish with OK.
- Back on the Discovery Management page, in the Assigned section, verify that the user is added.
How to assign “MailboxSearchApplication role in eDiscovery management”
The third step is to allow the service_account user to search for resources.
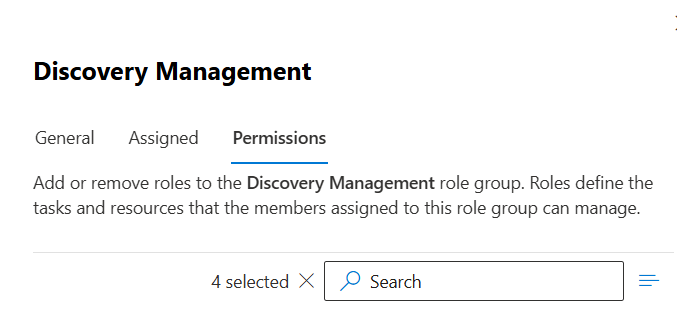
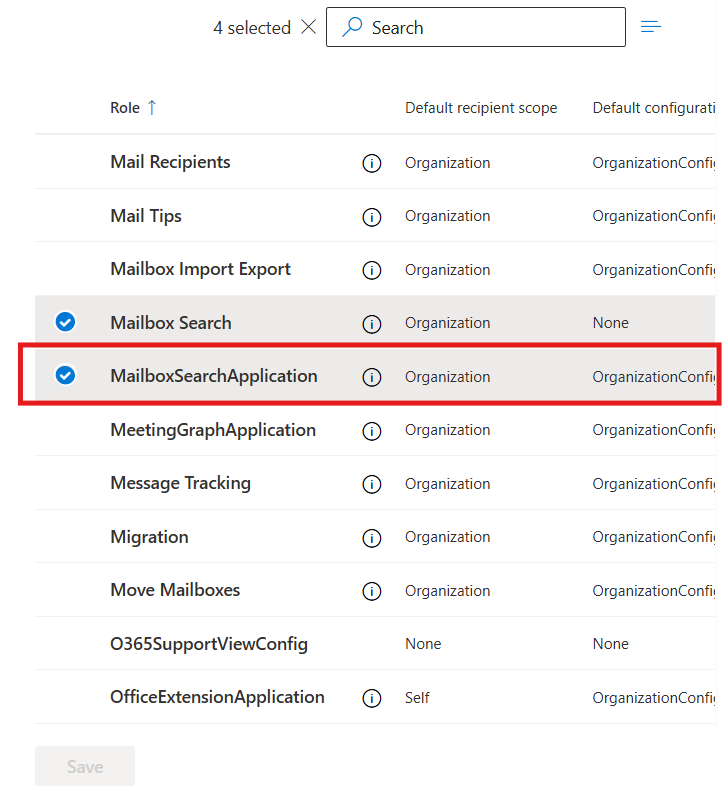
- In the EAC, go to Roles> Admin roles, select the Discovery Management role group
- On the Discovery Management page, in the Permissions section, select MailboxSearchApplication and click Save.
Method 2: Shared Mailbox
Create a shared mailbox
The first step is required to grant the permission to edit the calendar events.
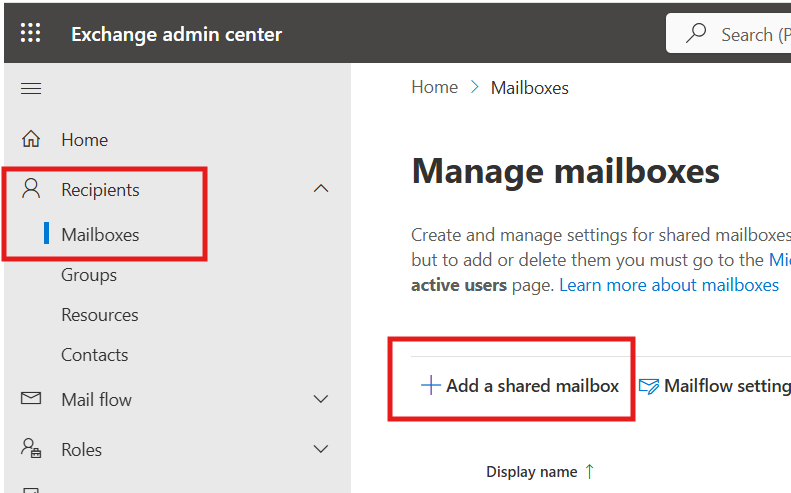
- Open Exchange Admin Center (EAC) as an administrator
- Select Recipients and Mailboxes, then click Add a shared mailbox.
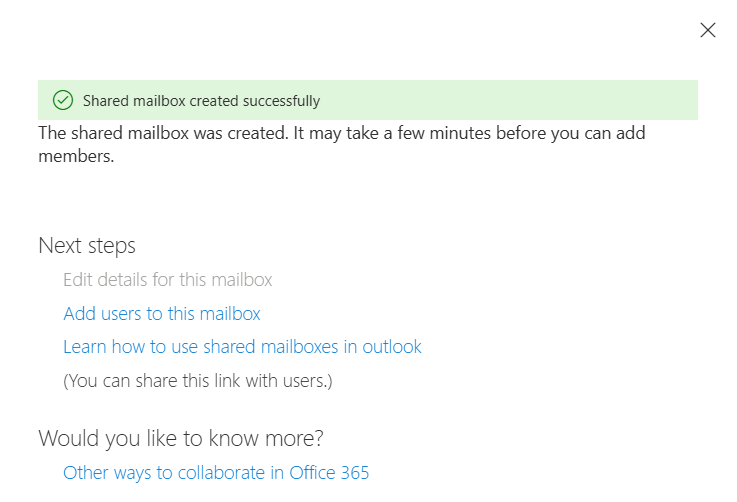
- In the Add a shared mailbox dialog, enter the required name and email address and then click Create.
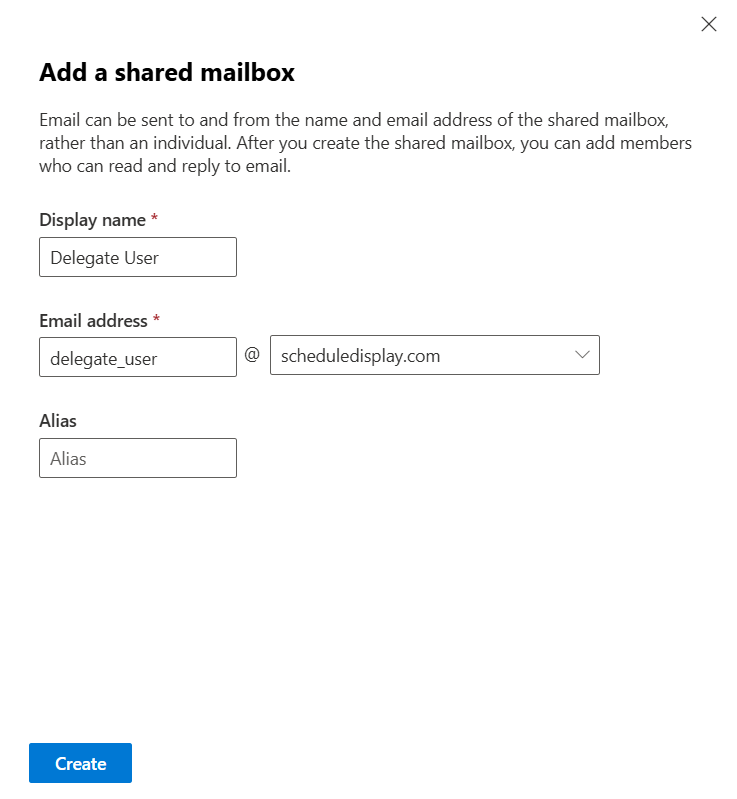
- After creating a shared mailbox, click on Add users to this mailbox to add your administrator user here. It’s not needed to add all your meeting room users.
Assign delegate rights to access the events/meetings of the resource/room
- In the EAC, select recipients and resources.
- If you haven’t created a resource yet then click add and read here to create a resource. Select an existing resource and click edit if your resources are already set up.
- In the Edit Room Mailbox dialog, select Delegation, scroll down to Read and manage (Full Access) and click Add/Edit
- Click on Add members and Select the service account you created in step 2.
- Click Save.
Resolve “The caller has not assigned any of the RBAC roles requested in the management role header”
The second step is to full fill another criteria of the RBAC (role based access control) concept. The shared mailbox user needs to be assigned a specific admin role.
- Open Exchange Admin Center (EAC) as an administrator to fix the RBAC (role based access control) issue
- In the EAC, go to Roles > Admin roles, select the Discovery Management role group.
- On the Discovery Management page, in the Assigned section, click Add.
- Select a user or group and click Add. Finish with OK.
- Back on the Discovery Management page, in the Assigned section, verify that the user is added.
How to assign “MailboxSearchApplication role in eDiscovery management”
The third step is to allow the shared mailbox delegate user to search for resources.
- In the EAC, go to Roles> Admin roles, select the Discovery Management role group
- On the Discovery Management page, in the Permissions section, select MailboxSearchApplication and click Save.
Connect to Office Microsoft 365 (formerly known as 0365) Resource calendars
The basic Microsoft Authentication is deprecated after 13 Oct 2020 for Microsoft 365 (formerly known as 0365). The new MS OAuth v2 requires to authenticate the app/user by giving an admin user consent.
Step 1: for Microsoft 365 (formerly known as 0365): Check .asmx link for your meeting room. (You’ll need it in Step 2)
- Try https://outlook.office365.com/EWS/Exchange.asmx in your browser. It should ask for credentials.
- If the link above does not work, read this article to know about getting the .asmx link for your resource.
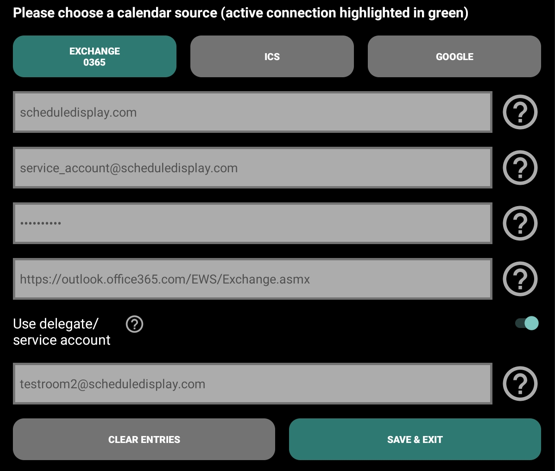
Step 2: Connect to Meeting Room Schedule
- Install Meeting Room Schedule in your android device.
- Tap and select the option Settings from the top right of the main screen.
- From the list of options, select Calendar connection.
- Select the option Exchange (read the instructions on the screen for more help).
- Enter the domain in the first field. For example, yourcompany.com.
- Enter the delegate/service account credentials.
- Enter the exchange server URL (.asmx) obtained from step 1.
- Turn on the switch Use delegate/service account.
- A new field will appear below this switch, enter the resource calendar address in this field.
- Select Save & Exit.
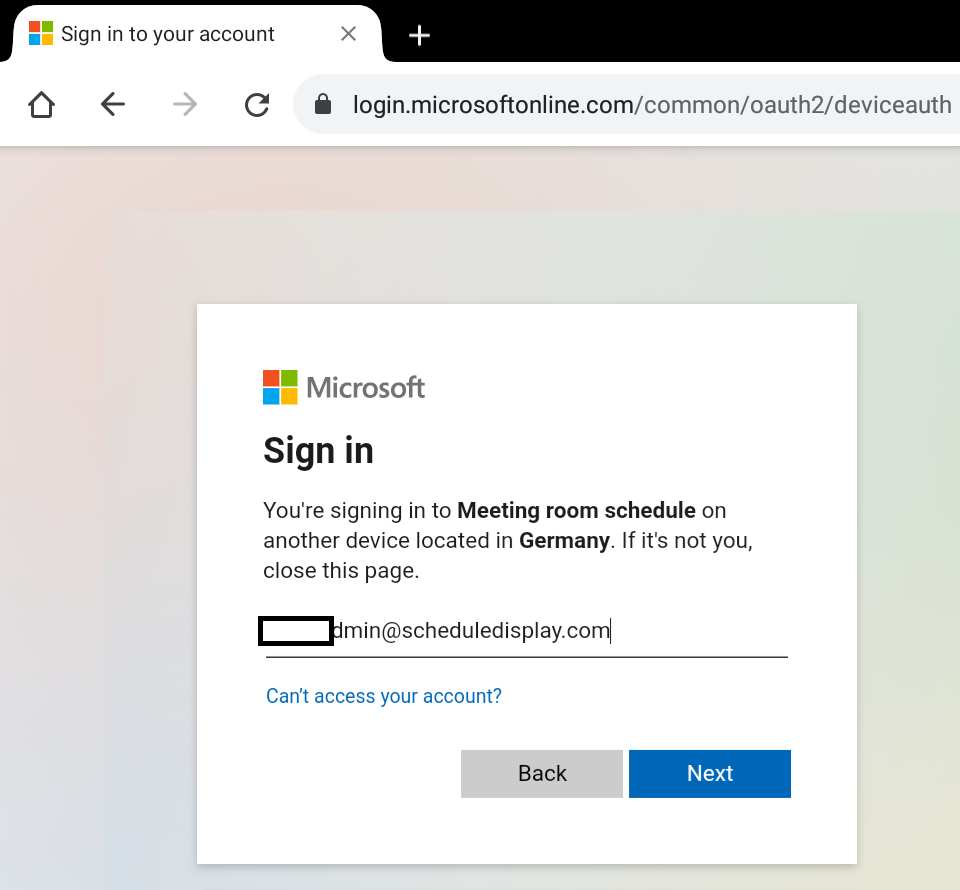
- You will see a popup with a code. Copy that code and press OK.
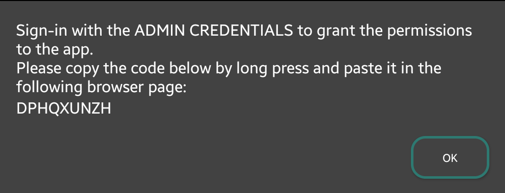
- The browser page will open. Paste the above code into the field and press Next.

- Sign in as an admin. After signing in you will be asked to accept the requested permissions along with the checkbox at the bottom saying “Consent on behalf of your organization”. It will grant the consent for all the resources (In case of a change to another resource, you have to go to exchange connection in the app, enter another resource address and press Save & Exit. The app will connect to that resource and you don’t have to repeat all these steps again). Click on the checkbox and press Accept.

- You will see the following page that you have signed in to the app successfully.

- Close the browser and press back button to go back to the Meeting room schedule app.
- The app will check the permissions and automatically go to the main display screen.
Step 3: Fine Tuning of Exchange/Microsoft 365 (formerly known as 0365) Settings
- Using Powershell, you’re able to access advanced settings. The following two settings have the biggest effect on what’s shown on the app as subject of the meeting:[-AddOrganizerToSubject <$true | $false>] and [-DeleteSubject <$true | $false>]
- Here you’ll find a complete list of advanced settings.
- How to access powershell? Check this documentation from Microsoft.
Connect to Microsoft Exchange Resource calendars
Step 1: for Exchange: Check .asmx link for your meeting room. (You’ll need it in Step 2)
- Try https://yourserver/EWS/Exchange.asmx in your browser. It should ask for credentials.
- If the link above does not work, read this article to know about getting the .asmx link for your resource.
Step 2: Connect to Meeting Room Schedule.
- Install Meeting Room Schedule in your android device.
- Tap and select the option Settings from the top right of the main screen.
- From the list of options, select Calendar connection.
- Select the option Exchange (read the instructions on the screen for more help).
- Enter the domain in the first field. For example, yourcompany.com.
- Enter the delegate/service account credentials.
- Enter the exchange server URL (.asmx) obtained from step 1.
- Turn on the switch Use delegate/service account.
- A new field will appear below this switch, enter the resource calendar address in this field.
- Select Save & Exit to go to the main display screen.
Step 3: Fine Tuning of Exchange/Microsoft 365 (formerly known as 0365) Settings
- Using Powershell, you’re able to access advanced settings. The following two settings have the biggest effect on what’s shown on the app as subject of the meeting:[-AddOrganizerToSubject <$true | $false>] and [-DeleteSubject <$true | $false>]
- Here you’ll find a complete list of advanced settings.
- How to access powershell? Check this documentation from Microsoft.
For more information please visit these links:
https://gsexdev.blogspot.com/2012/11/using-ediscovery-to-search-mailboxes.html
“>