
Font customization
When using Meeting Room Schedule as your meeting room door tablet software, one necessary step you have to traverse is the font customization. It is important to adapt your display based on your company theme, logo etc. This guide gives an overview of how to customize your fonts in the Meeting Room Schedule app. Click here to watch a video.
Areas of font customization
The app allows font customization for specific areas in the display. The below image shows the different areas in the main screen where font customization can be done.
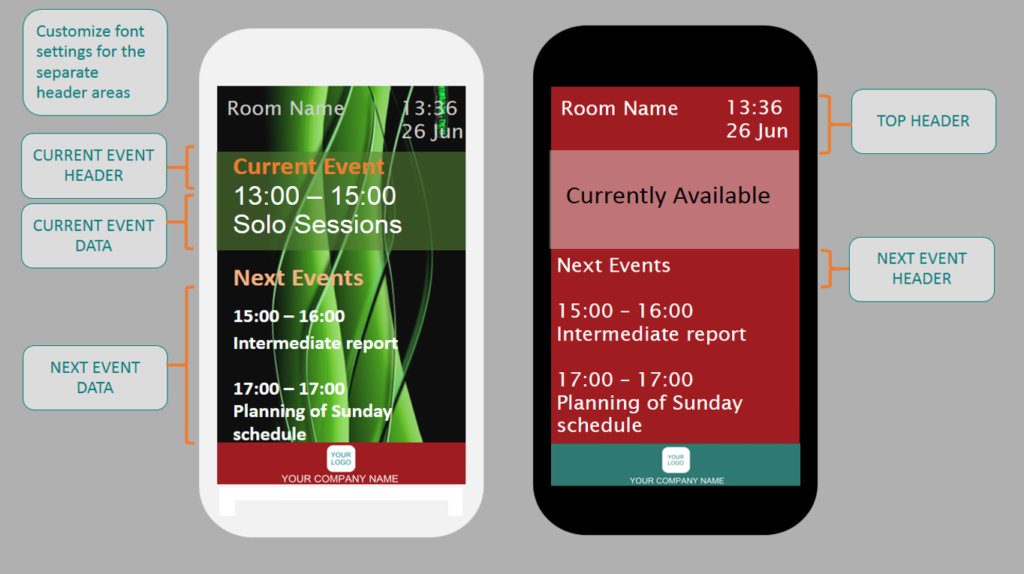
- Top Header displays the meeting room name and the device date/time. Any font customization in this area is applied to both the room name and the date-time.
- In the current event section, customization can be done at 2 levels – Current Event Header and Current Event Data. Current Event Header displays the static title of the current event section, refer the ‘Current Events’ text in the below image. Any font customization applied to section is also applicable to the text ‘Currently available’, which is displayed when no ongoing events are present. Current Event Data section refers to the summary of the meeting displayed under the current events section.
- In the upcoming events section, customization can be done at 2 levels – Next Event Header and Next event Data. Similar to the current events section, Next Event Header refers to the title of the section and Next Event Data section displays the list of upcoming meetings in the calendar.
Customization in Style Settings
The first step is to prepare a rough idea about the areas in the display you want to customize, the colors you want to use, the font sizes etc. Of course you can test this during the customization process using the preview option. Preview option shows an overview of the customization on dummy data without saving it to the main screen. But it would be a good idea to have a rough sketch on what you want to achieve. Read this article (coming soon) to get some tips specifically on how to pick fonts and customize font size.
Follow the below steps to apply the desired font customization,
-
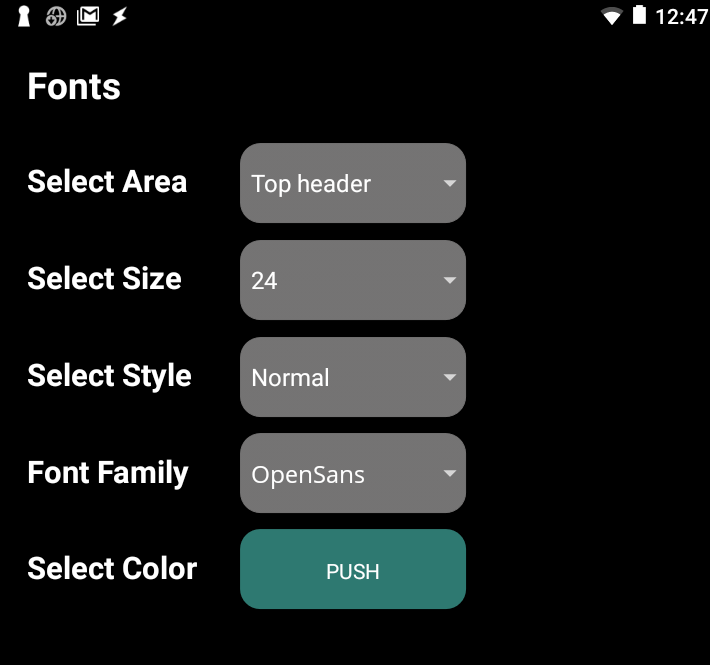
- From the main screen navigate to Settings > Style Settings page
- From the main screen navigate to Settings > Style Settings page
- Choose the area you want to customize (eg: Current Event Header), under the Fonts section, from the dropdown Select Area
- The default settings of the selected area will be populated in the following sections,
- Select Size
- Select Style
- Font Family
- Select Color
- Modify these fields as per your requirement.
- Click on preview button at the bottom of style settings to see how the customization will look on the main screen.
- To customize the next section, you can repeat steps 2-5. You don’t have to save the customization of each area, it is already saved, until you discard the changes by exiting from style settings.
- Once all areas are customized, check the preview to make sure you have achieved the look you were aiming for.
- Finally, click on Save to apply the changes to main screen.